Imagine the scene: The night is still, the moon is casting a gentle glow through the nursery window, and the sweet sound of a baby’s cooing turns into a hungry cry. It’s time for a feeding, but the question lingers in the air, how to warm baby bottle? In the early days of parenthood, even simple tasks can seem daunting. This piece will guide through the process of warming a baby’s bottle, ensuring a safe, comforting meal for the little one.
The first time one holds a baby bottle under warm water, feeling the heat gently spread from the base to the tip, the responsibility can feel overwhelming. Yet, with the right knowledge, this task transforms from a chore into a new way to provide for the newborn. This article will not only explain how to warm a baby bottle properly, but also share tips and tricks on how to make the process smoother and safer, ensuring the right temperature that soothes the baby’s tummy and aids their sleep.
Preparing the Bottle
Start with a sparkling clean bottle to ensure the baby’s health. Next, measure the precise amount of formula to provide adequate nutrition. Then, firmly close the bottle to prevent leakage. Storing the bottle in a dry, cool place keeps the formula fresh. Finally, when it’s feeding time, reheat pre-made bottles gently, ensuring a lukewarm temperature for a pleasant feeding experience.
Clean the Bottle
As the warm, comforting aroma of freshly prepared formula wafts gently through the air, imagine a pristine, sparkling bottle ready to hold the precious meal for the little one. Cleaning the bottlemeticulously is the first step in this process.
Imagine an orchestra of bubbles dancing on the surface of warm, soapy water, a symphony of cleanliness that envelops every inch of the bottle. Let the bottle take a relaxing, invigorating bath, soaking in the warm water, and shedding any lingering residue or unwanted particles.
Next, envision a brush, its bristles firm yet gentle, swaying rhythmically as it ventures inside the bottle. With a gentle scrub, the walls of the bottle gleam with cleanliness, ready to embrace the nourishing formula. Rinse the bottle with crystal-clear water, watching as the droplets cascade down, leaving a trail of purity behind.
This process ensures a clean, safe feeding environment, setting the stage for the preparation of the formula.
Measure the Amount of Formula
Shifting gears, let’s delve into the art of measuring the right amount of formula. Picture this: A seemingly simple task, but oh, how vital it is! Here’s the deal: Accuracy is of utmost importance. Too little and the baby remains hungry; too much and the baby could suffer from unpleasant digestive issues.
Step right into the kitchen, armed with a clean, dry scoop provided with the formula package. Now, imagine a gentle snowfall. That’s how the formula should fall into the scoop—light, fluffy, and never packed.
Remember, level is the goal. Use a clean knife to scrape the excess off the top, creating a flat surface.
But wait, there’s more! The water-to-formula ratio is crucial. Always follow the manufacturer’s instructions to a T. It’s not rocket science, but it’s indeed a delicate dance of precision. So, pour the measured formula into the pre-boiled, cooled water, and stir gently until it dissolves. Voila!
Close the Bottle
Moving from the measurement stage, let’s focus on the vital step of closing the bottle. Imagine the joy of a perfectly prepared meal; now, picture the potential disaster if left uncovered. Likewise, securing the baby’s bottle properly is an essential task.
Gently take the cap of the bottle, ensuring no rough movements that can disturb the settled formula. Then, align the cap over the mouth of the bottle. Remember, the fit should be just right, not too tight that it becomes a struggle to open later and not too loose that it risks spilling the contents.
Once aligned, start rotating the cap in a clockwise direction. Feel the subtle clicks as the threads engage and the cap slides smoothly into place. The goal here is to create a secure seal that keeps the precious formula safe and fresh.
And there you have it! The baby bottle is now ready and waiting for its time of duty.
Using a Bottle Warmer
Firstly, let’s fill the warmer with water. This step is easy and will set the stage for a smooth bottle-warming process. Next, gently place the bottle in the warmer, ensuring it’s secure. Now, it’s time to adjust the temperature settings. This stage demands precision, as it determines how warm your baby’s meal will be. Moving on to temperature control, a vital feature that maintains a consistent warmth for the feed. Lastly, notice the time efficiency of the warmer, appreciating how quickly it heats up the bottle, saving precious minutes in a busy parent’s day.
Fill the Warmer with Water
Gone are the days of complicated bottle preparation tasks. Now, an excitement fills the air as we embark on the journey of using a bottle warmer. Close your eyes and imagine the calming sound of trickling water as you fill the warmer with water.
Just a smidge more than a whisper, the gushing water flows, filling the welcoming cradle of the warmer. Picture the water level rising, submerging the heating element located at the bottom of the reservoir. Never overfill the warmer, just enough to cover the heating element, creating a steamy hot tub for the bottle. Imagine the water’s temperature rising, creating a cloud of steam that dances above the warmer.
Remember, the amount of water can affect how quickly the bottle warms. Less is more. Too much water, and the warmer takes longer to heat. The perfect balance of water brings the bottle to the ideal temperature quickly and efficiently.
Place the Bottle in the Warmer
Having now prepared the bottle, let’s move to the next thrilling chapter – the art of using a bottle warmer. Imagine the scene – a serene kitchen, early morning light streaming through the windows, and you, about to embark on this new journey.
But wait, there’s more! The Bottle Warmer, a device so simple and yet so essential. Fill it up with just the right amount of water, and it’s ready to perform its magic.
Next, the spotlight is on the hero of this narrative – the bottle. Gently, as if cradling a newborn kitten, place the bottle in the embrace of the warmer. A perfect fit, isn’t it? The bottle, swaddled securely, begins its warming journey. The harmonious encounter of the bottle and the warmer, a sight to behold.
Remember, this is not just a prosaic task, but a dance between the bottle and the warmer. A rhythm, leading to the final crescendo – a perfectly warmed bottle ready for your precious little one.
Adjust the Temperature Settings
Moving on from the process of preparing the bottle, let’s take a leap into the exciting world of bottle warmers!
Ah, just picture it. The warm glow of the digital display, the soft hum of the machine, and the gentle steam that wafts up, wrapping the surroundings in a comforting embrace. It’s time to master the art of adjusting the temperature settings.
Before diving in, remember this golden rule: Always keep baby’s safety and comfort in mind. Now, look for the temperature control knob or digital display. It’s usually located on the front or top of the machine. Gently turn the knob or press the buttons to adjust the temperature. Most warmers offer a range between warm and hot, but remember – baby’s milk should never be too hot.
Aim for a lukewarm temperature, around 98.6 degrees Fahrenheit (37 degrees Celsius) – the same as body temperature. The perfect temperature for baby to enjoy a cozy, comforting bottle.
Warming the Bottle in Hot Water
Begin the warming process by filling a bowl with hot water. Once done, gently submerge the bottle, ensuring it’s fully engulfed. After immersing, attentiveness to the temperature is vital. Like a faithful guard, consistently monitor the heat ensuring it’s just right, not too hot, not too cold – like Goldilocks’ porridge. Now, for the timing of bottle warming, a crucial step, patience is key. Don’t rush, let the warmth seep in slowly. Last, but certainly not least, comes testing the formula temperature. This step’s importance can’t be overstressed.
Fill a Bowl with Hot Water
Leaving the world of bottle warmers behind, let’s step into the simplicity of warming a bottle using good old hot water. To start this process, fill a bowl with hot water. Seek out a deep bowl, one that can comfortably accommodate the bottle without any risk of toppling over.
Once the right vessel is selected, fill it up with hot – not boiling – water. Remember, the goal is to warm the bottle, not scorch it! Allow the water from the tap to run until it reaches the right temperature. Imagine a soothing bath, warm enough to relax but not hot enough to cause discomfort. That’s the perfect temperature.
Now, fill the bowl to about three-quarters full. This should allow the baby bottle to be fully submerged later on. With the bowl filled with warm water, the stage is now set for the next step – submerging the baby bottle. Exciting, isn’t it?
Submerge the Bottle
Venturing away from the realm of bottle warmers, one may discover the charming simplicity of using hot water as a warming mechanism. Embracing a more traditional method, the act of submerging the bottle in hot water paints a picture of warmth and simplicity that rings of a bygone era.
With a steaming bowl of water at the ready, the bottle is gently immersed into the welcoming bath. The water, hugging the bottle in a warm embrace, begins to gradually transfer its heat to the contents within. As the bottle descends into the water, a symphony of tiny bubbles dances up from the surface, painting a delightful picture of nature at work.
Patience is the key here. It is not a hurried process, but a slow, rhythmic dance of heat transition. The bottle must remain submerged until the desired warmth is achieved, ensuring every drop of milk or formula is perfectly heated to soothe the baby’s palate.
Check the Temperature
Shifting gears from the world of bottle warmers, let’s jump into the simplicity of hot water baths. Now, onto the crucial step – checking the temperature.
Ever touched the surface of a fresh cup of coffee? Imagine that warmth. That’s roughly the ideal temperature for the bottle. Not too hot, not lukewarm. To ensure this, swirl the bottle gently in the hot water bath. Do not shake it. Shaking might create hot spots in the formula, risking burns in the baby’s mouth.
Next, place a clean thermometer in the water, not touching the sides or the base of the container. Aim for a cozy 98.6°F (37°C) – reminiscent of a mother’s soothing embrace. A touch cooler won’t harm, but hotter can scorch.
Remember, the goal is to mimic the warmth of breast milk – a comfort food in the truest sense. With a keen eye and a gentle hand, achieving this is a breeze.
Warming the Bottle in the Microwave
First, place the bottle in a safe container ensuring it’s secure. Then, set the microwave for 10 seconds, a quick zap to start the warming process. Carefully, check the temperature—a vital step to prevent overheating. It’s important to use microwave-friendly bottles, designed to withstand the heat. If this method proves unsuitable, consider alternative warming methods, offering a safe and efficient way to heat baby’s meal.
Place the Bottle in a Safe Container
In the blink of an eye, we’ve moved from the cozy warmth of the stove to the dazzling light of technology. Imagine this: a microwave, humming softly in the quiet kitchen, standing ready to accomplish the mission of bottle warming.
First things first. Safety is paramount. When using a microwave, it’s crucial to place the baby’s bottle in a safe and microwave-friendly container. This container acts as a barrier between the radiation and the bottle, ensuring that the milk heats evenly and safely.
Choose a container made from microwave-safe glass or ceramic. This will not only protect the baby bottle but also prevent any dangerous chemical leaching from plastics. The container should be large enough to fit the baby’s bottle snugly, but not so large that the bottle will move around.
Remember, this is not about rushing. It’s about warming your baby’s meal in a safe and loving manner. So, happy warming!
Set the Microwave for 10 Seconds
Gently transitioning from the traditional method of heating a baby bottle in hot water, let’s delve into the modern, quick, and convenient microwave method. Now, it’s time to discuss the critical step of setting the microwave for a perfect warm up of 10 seconds.
Imagine a microwave: the soft hum, the bright interior light, and the rotating glass plate. Nestled within this warm, inviting space, prepare to place the well-sealed baby bottle. But first, we must set the timer. Amid the array of buttons, find the time set button – it’s usually positioned centrally on the control panel.
A soft touch on this button, followed by a swift tap on the number ‘1’ and ‘0’, should set the microwave to warm the bottle for a quick 10 seconds. Remember, less is more in this instance. The goal is a gentle warming, not a vigorous boil.
Stay tuned for the next section, where we’ll discuss how to check the temperature of the warmed milk.
Check the Temperature
And just like that, we’ve arrived at a crucial step: checking the temperature. It’s like a goldilocks scenario, where the bottle’s temperature should not be too hot, nor too cold, but just right.
After the microwave’s beep signals the end of the warming period, take a minute to visually inspect the bottle. Look closely for any hot spots which may have formed. These sneaky spots often hide, ready to surprise unsuspecting little ones with an unpleasant scorch.
To confirm the temperature, shake the bottle gently and pour a small drop onto the back of the hand. The liquid should feel warm, not hot. If it’s a little too heated, consider letting it cool down before serving. If it’s not warm enough, return it to the microwave, but remember, only for another few seconds.
This method, like a caring hug, ensures the perfect, cozy temperature for every feed, providing comfort and safety in every sip. Safety first, always.
Testing the Temperature
The warmth of a few drops of formula, gently shaken onto the wrist, paints the initial picture of the bottle’s temperature. An endearing touch, almost like a soft whisper, presents an opportunity to determine if reheating is necessary. It’s all about maintaining that just right temperature consistency, a comforting lullaby for the baby’s palate. Recognizing the right degree of warmth becomes an art form, akin to understanding the baby’s needs. It’s an enjoyable task, filled with the promise of nourishment and care. Always remember, too hot or too cold may disrupt the baby’s feeding experience, so keep the formula perfectly warm.
Shake a Few Drops of Formula Onto Your Wrist
Stepping away from the whirl of microwaves and heat waves, one now finds themselves ready to test the temperature of the freshly warmed formula. Just as a chef tests the seasoning of a simmering pot, so must one test the warmth of the baby’s bottle.
A brief shake of the bottle disperses the heat evenly, ensuring no pockets of extreme warmth. And then, the wrist test. The inside of the wrist, so soft and sensitive, offers an accurate gauge of temperature. A few drops, gently shaken onto the skin, whisper their warmth. Not too hot, not too cold, each droplet should mirror the comforting embrace of a mother’s hold.
The formula should be warm, but never scalding. If there’s a hint of a wince as it touches the skin, it’s too hot. If a small shiver runs down the arm, it’s too cold. This delicate dance of temperature testing is crucial, ensuring the bottle is just right for the baby’s delicate palate.
Feel the Temperature of the Formula
Well, now that the bottle is all warmed up in the microwave, it’s high time to make sure it’s just right for your baby’s feeding! Here comes the part where feeling the temperature of the formula comes into play.
Imagine a gentle stream of warmth flowing onto the skin. With an easy tilt of the bottle, allow a few drops of formula to fall onto the inside of the wrist. The wrist, with its sensitive skin, works as an excellent thermometer. It should feel warm but not hot. It’s akin to stepping into a bath with the perfect temperature, a delicate balance of warmth, neither scalding nor too tepid; a comforting embrace of heat that soothes, not stings.
Remember, it’s always better to err on the side of the formula being too cool than too hot. The golden rule here is, if it feels too hot on the wrist, it’s definitely too hot for the baby’s mouth. With this comforting warmth, the bottle is ready to offer a delightful feeding experience!
Reheat the Bottle if Necessary
Moving gracefully from the microwave stage, let’s now venture into what to do if the formula isn’t quite warm enough yet.
Imagine the scenario: You’ve gently shaken a few drops onto your wrist and they’re not quite the right temperature. What now? This is where the reheating method comes in handy.
Take the bottle and pop it back into the microwave for a few seconds. Keep in mind, though, to set the microwave to a lower power setting. This prevents the formula from overheating and causing a potential hazard. Remember, a few seconds can make a big difference.
Once the microwave beeps, take the bottle out and give it a good shake to distribute the heat evenly. Just like the first time, test the temperature again on your wrist. This time, the formula should be at the ideal warmth for your baby’s meal. Here’s to a successful feeding session!
Storing the Formula
Delve into the art of Storing the Formula with utmost care. First, explore the cozy confines of an Insulated Bag, a safe haven that maintains the formula’s temperature. Then, uncover the merits of simply letting the bottle rest at its own pace in the gentle ambiance of Room Temperature. With a quick segue into the importance of Discarding Leftover Formula, experience the relevance of freshness. On a journey? Discover the hassle-free techniques for Traveling with Stored Formula. Lastly, tread lightly into the icy realm of Freezing Formula Precautions, a delicate balance of preservation and safety.
Place the Bottle in an Insulated Bag
Look at this! After testing the temperature and finding the sweet spot, the next step is to store the formula correctly. And guess what? Placing the bottle in an insulated bag is a smart way to start.
Imagine a soft, weather-proof bag with a snug pocket, perfect for the baby’s formula-filled bottle. The outside world, with its fluctuating temperatures, can’t touch the contents inside this bag. The insulated bag acts like a loyal guard, eager to maintain the perfect balance for the liquid gold inside. Remember, for the bag to work its magic, ensure the bottle’s lid is tightly secured to prevent any spills.
Feel the softness of the bag, see the bottle snuggled inside, and think of the warmth it retains. The insulated bag is not just an accessory, but an essential companion in the journey of formula feeding. It’s all about providing the best for the little champ, isn’t it?
Keep the Bottle at Room Temperature
Leaving the world of temperature testing behind, imagine now a cozy, comfortable room. Here, the air hangs lightly, neither too warm nor too chilly, but just right. This is the perfect environment for keeping that precious bottle of formula at room temperature.
Whoa, hold on! Why room temperature, you ask? Simply put, it’s because room temperature is the Goldilocks zone for your baby’s formula. Not too hot that it’ll breed bacteria, and not too cold that it’ll lose its freshness.
Now, here’s the magic trick. After preparing the formula, don’t screw the cap on the bottle too tightly. This allows for a bit of air circulation and keeps the formula from turning sour.
And voila! With these steps, your baby’s formula is kept at the perfect temperature, ready for their hungry little tummies whenever they need it. Quite a simple yet vital part of your parenting toolkit, wouldn’t you agree?
Discard Leftover Formula
Gleefully transitioning from the careful calibration of temperature checks, one now delves into the realm of formula management. Specifically, the focus falls upon the act of Discarding Leftover Formula.
Imagine this: a bottle filled with the day’s formula, forgotten on the counter. Time ticks by, and the formula no longer remains fresh. With a good-natured chuckle, one must accept that it’s time to bid farewell to the leftovers. Toss it away, don’t hold on to it.
Unconsumed formula, left at room temperature, becomes a playground for bacteria after an hour. With a merry, but firm, resolve, ensure its disposal. No ifs or buts about it.
In the refrigerator, the clock doesn’t stop either; the formula must be used within 48 hours. Post that, it’s time to let it go. Remember, it’s all in the name of ensuring the highest quality nutrition and safety for the little ones. So, wave a friendly goodbye to that leftover formula!
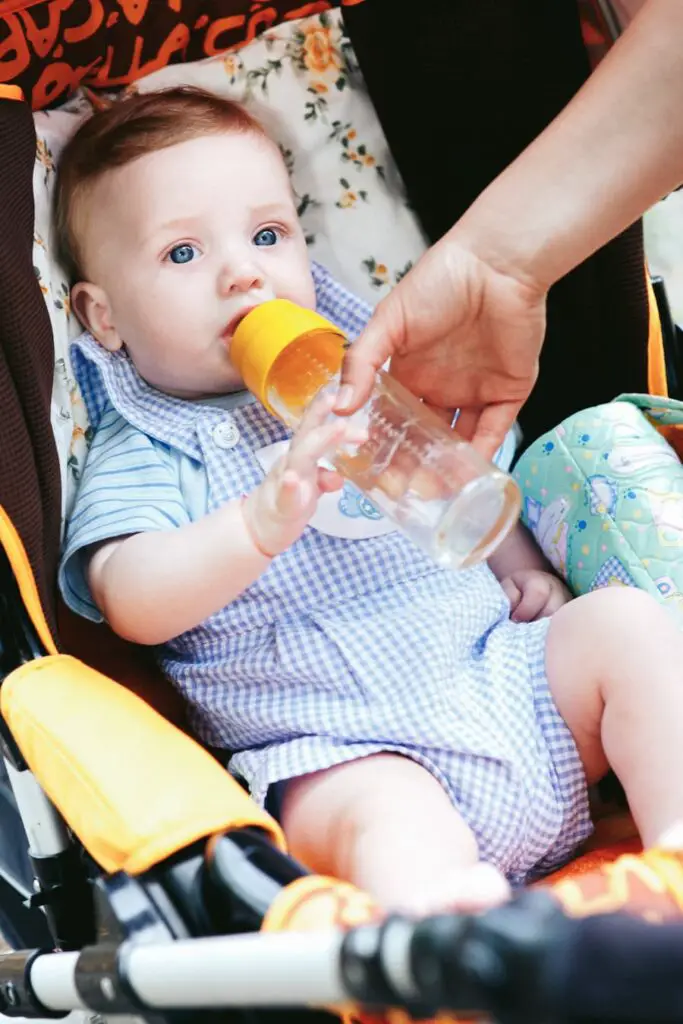
Feeding the Baby
Begin by placing the baby in an upright position, a nurturing posture that aids digestion. Next, give the baby the bottle, a bonding moment filled with warmth. Carefully monitor the baby’s reactions to identify any discomfort or pleasure. Should any feeding problems arise, address them promptly with a serene smile, ensuring the baby’s wellbeing. Lastly, emphasize the importance of safe storage of baby food, a precautionary step that guarantees freshness and hygiene. All in all, feeding the baby becomes an endearing task, filled with careful observation and boundless love.
Place the Baby in an Upright Position
Having safely stored the formula, let’s glide into the next step. Imagine a cosy corner. The soft hum of a lullaby playing in the background. This is where the magic happens. Placing the baby in an upright position is the first move in this symphony of nourishment.
Picture a soft, cushioned surface. Gently, the infant is nestled, their tiny back supported by the firm yet tender touch of a loved adult’s hand. The tiny head cradled in the crook of an elbow. The delicate balance of comfort and safety is maintained, ensuring an angle ideal for feeding. In this upright position, the baby’s head is slightly elevated, easing swallowing and digestion.
Yes, it’s more than just a feeding position. It’s a cocoon of care, a soft sanctuary which signals the beginning of a nourishing journey. Remember, safety and comfort are the guiding stars in this constellation of care.
Give the Baby the Bottle
And now that the formula is safely stored, it’s time to get to the heart of the matter: feeding the baby.
Picture this: A cozy, tranquil setting, well-lit and warm. In your hands, a bottle of carefully prepared formula, at just the right temperature. Now, gently introduce this bottle to the baby’s lips. First, let the little one take a small sip to get used to the taste. Then, once comfortable, slowly increase the amount.
Keep in mind, pace is everything. Rushing could lead to feeding problems like choking or overeating. It’s not about time, it’s about patience and care.
Remember to always hold the bottle at an angle that allows the formula to fill the nipple. This prevents the baby from swallowing air, which can cause discomfort.
In this magical moment of connection, each gulp is a step towards growth and health. What a joyous journey it is!
Monitor the Baby’s Reactions
“Alright, now that the baby’s formula is stored properly, it’s time to pass the baton to our next player. No, not a track race, but the baby’s reactions while feeding.
As the baby relishes that warm bottle, a keen eye on their reactions holds utmost importance. Look out for the smiles, the giggles, or the occasional quizzical eyebrow raise. These adorable displays of emotion can speak volumes about whether the taste hits the right notes or not.
Now, if the face scrunches or the lips purse, that’s not a masterpiece to hang on the fridge. It might indicate a dislike for the formula or a tummy in distress. It’s like a secret language, a baby Morse code that says, “Change the formula” or “Bellyache alert!“. So, never underestimate those tiny expressions, they might just crack the code of your baby’s comfort.
Feeding time can reveal a lot, so keep those detective glasses on!
Cleaning the Bottle
Immerse in the process of Cleaning the Bottle. Begin with a gentle Rinse the Bottle, shaking away any remaining liquid. Next, dive into Wash the Bottle, scrubbing carefully to ensure a thorough cleanse. After washing, it’s time for Sanitize the Bottle, a step that guarantees the elimination of any lingering germs. Moving forward, focus on Avoiding Residue Buildup, a careful measure to maintain the bottle’s cleanliness over time. Lastly, ensure Safe Storage Post-Cleaning, a final precaution to keep the bottle ready for next use. Enjoy this satisfying journey, leaving the bottle sparkling clean and perfectly
Rinse the Bottle
Just imagine: a pristine bottle ready to serve another nourishing meal to the little one. The first step to achieving this? Rinsing the bottle.
This step seems simple, yet it’s the cornerstone of a thorough cleaning process. As soon as feeding time wraps up, treat the bottle to a swift rinse. This prevents any remnants from adhering to the bottle’s inner surface, setting the stage for a smoother wash.
Holding the bottle under a strong stream of warm water, twist it around to ensure every nook and cranny comes under the rinse. Pay special attention to the nipple and cap, parts notorious for holding onto stubborn bits of formula or milk.
No fear if there’s no access to a sink immediately after feeding. Fill the bottle halfway with water, secure the cap, and give it a good shake. This temporary solution will hold the fort until a proper rinse can happen.
Remember, a clean bottle equals a happy baby – and a relieved parent.
Wash the Bottle
And the adventure continues! Now that the little one’s tummy is full, let’s move on to the next crucial step – taking care of that baby bottle.
Picture this – a baby bottle drenched in warm, soapy water, bubbles floating on the surface, and a soft bottle brush swirling inside. Washing the bottle is more of an art than a chore. Start by filling the kitchen sink or a basin with warm water, then add a few drops of mild, baby-safe dish soap. Ensure the water- soap mixture touches every nook and cranny of the bottle.
The star of this process? The bottle brush. With its long handle and perfect bristles, it reaches into the deepest corners, ensuring no milk residue is left behind. It’s like a magic wand, waving away all the dirt!
Remember, cleanliness is next to baby healthiness. A properly washed bottle means a happy, healthy baby. So, let’s wave that bottle brush and create some cleaning magic!
Sanitize the Bottle
And now, let’s step into the world of bottle sanitization. Picture this: hot steam envelops the bottle, reaching every nook and cranny, ensuring a germ-free environment for baby’s next meal.
First things first, fill a large pot with water, enough to submerge the bottle completely. Bring the water to a rolling boil, then gently place the bottle and all its components into the pot.
Let the water work its magic for at least five minutes. This thorough steam bath eradicates harmful bacteria, guaranteeing a perfectly sanitized bottle.
Now, here’s the secret. Always use a clean pair of tongs to remove the bottle from the water. It’s a small but crucial step to maintain the bottle’s newly acquired sterility.
Remember, a baby’s immune system is still developing. Sanitizing the bottle is not just about cleanliness, it’s about safeguarding baby’s health. Such simple steps, yet they promise a world of safety.
Next on the list: How to avoid residue buildup.
Conclusion
In the end, mastering how to warm baby bottle can be a simple task with the right techniques. The joy of preparing a perfectly warmed bottle resonates, ensuring your little one receives their nourishment in the most comforting way.
From using a bottle warmer to immersing it in hot water, or even using a microwave – each method guarantees a warm, not scorching, bottle ready for feeding. Remember, always double-check temperature before feeding, ensuring the utmost safety for your precious one.